
Construction Considerations for Basement Finishing
Finishing a basement is exciting—but let’s be honest, it’s also a major construction project happening inside your home. If you’re imagining a quick paint-and-floor job, the reality might catch you off guard.
At Berlin Homes, one of the most common questions we get is: “What’s it going to be like while you’re working?” This guide walks you through exactly what to expect during basement finishing construction—not just the phases, but how each step affects your space, your routine, and your peace of mind.
Knowing what’s ahead means fewer surprises, smoother decisions, and a better overall experience.
READ: What to Expect When Finishing a Basement in Utah
Before Construction Begins
Before a single 2x4 goes up or tool hits the floor, there’s an important phase homeowners often underestimate: the pre-construction stage. This is where your vision gets organized into a working, buildable reality.
Pre-Construction Planning
Once your basement layout and design are finalized, your contractor will do a detailed walkthrough with you. This includes:
Confirming materials and finishes: Flooring types, ceiling options, paint colors, lighting fixtures, etc.
Scheduling deliveries: Windows, doors, plumbing parts, electrical panels—these need to be on site early to avoid delays.
Defining the construction calendar: You’ll get a rough week-by-week breakdown of how the work will unfold.
This is also when you’ll get final pricing (with some room for unexpected issues, like hidden moisture or code-related changes).
Permits and Inspections
Basement finishing projects almost always require local building permits. Berlin Homes handles this for you, but it’s important to know:
Permit approval can take 1–2 weeks depending on your municipality.
Inspectors will need to visit at least twice: once after rough-in utilities (electrical, plumbing) and once at the end.
Inspections are required by law and ensure your new space meets fire safety, egress, and structural codes.
Site Prep and Moisture Control
Before day one of construction, your basement needs to be cleared of:
Furniture, storage bins, or valuables
Rugs, electronics, shelving
If you’ve previously had water issues, we’ll inspect sump pumps, floor cracks, and dehumidifiers to ensure you’re ready. Waterproofing should be completed before finishing begins, not during.
READ: Finishing Your Basement? Avoid These Expensive Mistakes
Communication and Scheduling
At this point, you should expect:
A dedicated project manager or lead carpenter
Weekly progress updates or schedule check-ins
A heads-up on “noisy” or high-traffic work days
We also recommend setting clear boundaries around when crews can work (most clients choose 8am–4pm) and what areas of the house are off-limits.
First Construction Phase
Once the planning is complete and permits are approved, your basement transformation officially begins. Construction is typically done in logical phases—starting from structural elements and utilities, moving toward finishes and details. This section will help you understand what to expect, step-by-step.
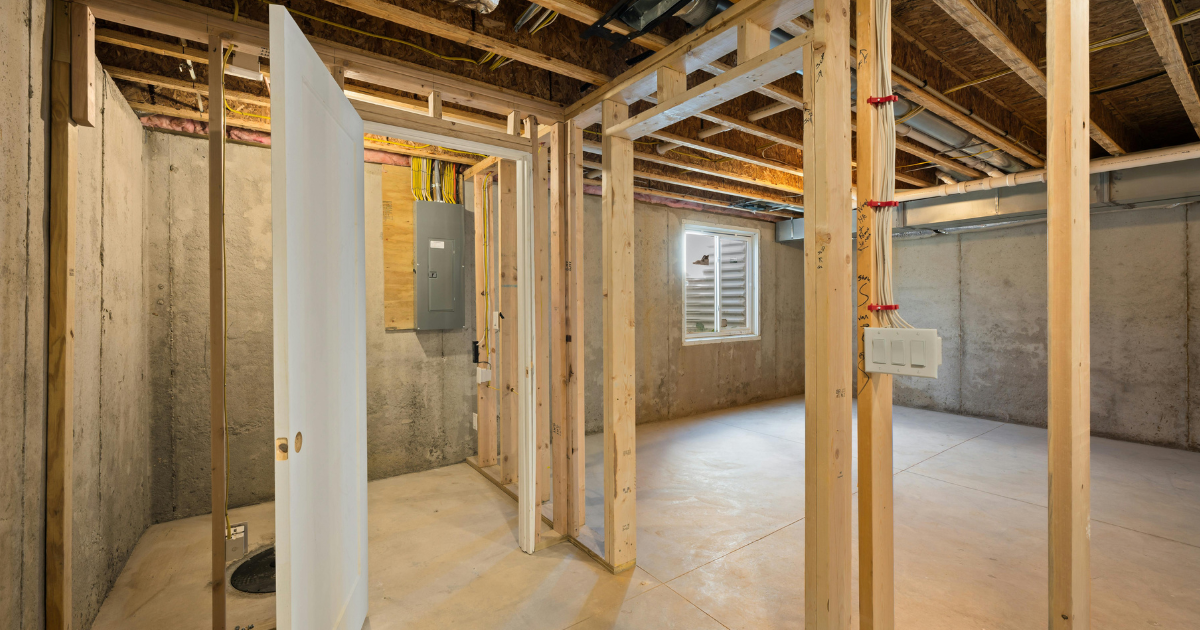
Framing and Layout Buildout
The first major change you’ll notice is framing. Your basement will start taking shape as walls go up and rooms are carved out.
What you’ll see: Wood or metal framing forming walls, ceiling soffits, closets, storage spaces, and potentially bulkheads to hide ductwork.
What you’ll hear: Power saws, nail guns, and the general hum of carpentry.
Timeframe: Typically 2–4 days depending on size and complexity.
This phase is fast-paced and exciting—it’s the first time your vision starts to feel real.
Electrical and Plumbing Rough-Ins
Once the framing is complete, licensed electricians and plumbers step in. This phase is all about laying the groundwork for function.
Electrical includes: Receptacles, switches, lighting, smoke detectors, and breaker panels.
Plumbing includes: Supply lines and drainage for any bathrooms, wet bars, laundry areas, or future additions.
Expect wall cavities and ceilings to be open while all wires and pipes are installed. This is a messy but essential stage, and inspections typically follow soon after.
What you’ll see: Wires running through studs, outlet boxes, exposed pipework.
What you’ll hear: Drilling, pipe cutting, coordination between trades.
Timeframe: Usually 3–6 days depending on the complexity.
HVAC and Ventilation Additions
Comfort is key in a finished basement. Depending on your existing system and the basement layout, this phase might include:
Extending ductwork from your main HVAC system
Adding supply and return vents
Installing a mini-split system or electric baseboard heat
Improving air circulation with fans or ventilation fans (especially in bathrooms)
Basements often struggle with airflow, so this step is critical not just for heating and cooling, but also for humidity control.
What you’ll see: Metal ductwork or wall-mounted HVAC units being installed.
What you’ll hear: Duct fabrication, insulation, coordination with other trades.
Timeframe: 2–4 days, often overlapping with electrical/plumbing work.
Insulation and Drywall Installation
After all the rough-in work is inspected and approved, the basement gets closed up. This stage is about making the space livable: warm in winter, cool in summer, and visually seamless.
Insulation: Quiet, Comfortable, and Code-Compliant
Insulating your basement serves three key purposes:
Thermal Comfort: Keeps the basement from feeling cold or drafty
Soundproofing: Reduces echo and noise between levels
Moisture Control: When the right insulation is used, it adds a barrier against moisture
Types of insulation commonly used:
Rigid foam board: Often placed directly against foundation walls
Spray foam insulation: Great for sealing air leaks and tight spaces
Fiberglass batt insulation: Common for framed interior walls
What you’ll see: Crews filling wall cavities and rim joists with insulation material.
What you’ll hear: Minimal noise—this is one of the quieter stages.
Timeframe: 1–2 days.
Drywall: From Framing to Finished Walls
This is one of the most visually dramatic stages in the project. With drywall up, the space starts to feel like an actual room rather than a job site.
The process includes:
Hanging drywall on walls and ceilings
Taping and mudding the seams and screw holes
Sanding the surface until smooth and ready for paint
Drywall work is dusty, and certain areas will need to remain off-limits while joint compound dries.
What you’ll see: Sheets of drywall being cut, fitted, and screwed into place.
What you’ll hear: Saws, drills, and sanding machines.
Timeframe: 4–7 days depending on the size of the basement and drying time between coats.
Bonus Tip: At Berlin Homes, we often use mold-resistant drywall in basements. It's a bit more expensive, but it adds another layer of protection, especially in humid climates or homes with a moisture history.
Flooring, Ceilings, and Walls Installation
At this point, the major construction is done, and it’s time for the space to take on its final look. You’ll begin to see design choices—from paint color to flooring texture—come together to create a livable, comfortable basement.
READ: The Best Basement Flooring Options for Utah Homes: What Works and What Doesn’t
Ceiling Installation
Ceilings in basements often need special attention due to low headroom and access to utility lines.
Common options:
Drop (suspended) ceilings: Practical for future access to pipes, wiring, or HVAC
Drywall ceilings: Clean, finished look, but limits future access
Exposed ceilings (painted joists): A modern industrial look that preserves height
What you’ll see: Tracks for drop ceilings or drywall being installed and painted.
What you’ll hear: Drilling, stapling, and possible light framing.
Timeframe: 1–3 days depending on type and square footage.
Flooring Installation
Basement flooring must handle potential humidity while still looking great and feeling comfortable. You likely chose materials during the planning phase. Here’s what to expect:
Popular basement-friendly flooring options:
Luxury Vinyl Plank (LVP): Waterproof, durable, and stylish
Tile: Great for laundry or bathroom areas
Carpet tiles or low-pile carpet: Adds warmth but needs a good subfloor
Engineered wood or floating floors: If moisture is well-controlled
What you’ll see: Crews prepping the subfloor, laying underlayment, and installing flooring
What you’ll hear: Cutting tools, adhesive setting, snapping tiles or planks into place
Timeframe: 2–5 days depending on material and square footage
Wall Finishing and Painting
Now that drywall is sanded and primed, painting begins. This is when the color palette you chose really sets the tone for your basement’s vibe—whether that’s cozy, vibrant, modern, or rustic.
Pro tip: Basements have limited natural light, so opt for lighter wall colors to make the space feel larger and brighter.
What you’ll see: Primer, paint, trim work, touch-ups
What you’ll hear: Minimal noise—mostly quiet brush and roller work
Timeframe: 1–3 days
Fixtures, Built-ins, and Final Details
With walls painted and flooring in, your basement now looks like a finished room. But it’s the final details—fixtures, cabinetry, hardware, and built-ins—that bring comfort and usability to the space.
Electrical Fixtures and Final Trim
At this stage, your electrician returns to install all visible components:
Light fixtures (recessed lights, pendants, ceiling fans)
Electrical covers, outlets, and switch plates
Smoke/CO detectors
Meanwhile, carpenters install baseboards, door trim, and any crown molding or window casings.
What you’ll see: A flurry of finishing touches being added all at once
What you’ll hear: Mostly quiet work—some light hammering or screwdriving
Timeframe: 1–2 days, depending on how custom the details are
Bathroom or Wet Bar Finishes (If Applicable)
If your basement includes a bathroom, kitchenette, or wet bar, this is when those fixtures go in:
Toilets, sinks, vanities, countertops
Faucets, showerheads, towel racks
Appliances or mini fridges for wet bars
These are installed after flooring and painting to avoid damage.
What you’ll see: A nearly livable, polished look
What you’ll hear: Plumbing adjustments, caulking, cleanup
Timeframe: 2–4 days for full bathroom or bar area
Doors, Built-Ins, and Storage Elements
This phase wraps up with details like:
Interior doors and hardware
Closet systems or shelving
Built-in cabinets, desks, or entertainment units
These features are usually custom-fit and help tie everything together both functionally and visually.
Cleanup, Final Inspection, and Punch List
With construction complete and fixtures in place, it’s time for the final wrap-up. But don’t assume “done” means “perfect.” The last 5% of a basement finishing job is where a quality contractor like Berlin Homes makes the biggest difference—through careful inspection, detailed cleanup, and honest follow-through.
Job Site Cleanup
Expect a professional cleaning crew to sweep, vacuum, and remove any remaining debris, dust, and packaging materials. While this isn’t a deep clean, it should leave your new basement:
Free of construction debris and dust
Safe to walk through barefoot
Ready for furniture and light use
Pro tip: At Berlin Homes, we also cover floor vents, polish fixtures, and clean windows to make your space feel turnkey—not just “done.”
Final Inspection (and Code Approval)
Your local building inspector will make one last visit to ensure everything complies with municipal building codes. This includes:
Egress windows
Electrical outlets and circuit load
Smoke/CO detectors
Plumbing fixtures and drains
Insulation and fire separation (in some areas)
Once the inspector signs off, your permit is officially closed, and your basement is considered legally habitable space.
The Punch List Walkthrough
Your project manager will walk through the entire basement with you, noting any:
Scratches, paint touch-ups, or scuffed trim
Loose outlet covers or hardware
Small fixes like adjusting doors or re-caulking seams
This punch list is standard procedure and ensures every detail is handled before you take full ownership of the space. Most fixes are completed within 1–3 business days.
Timeline Expectations
Basement finishing construction isn’t an overnight process, and it’s important to go in with realistic expectations. While timelines can vary based on the size and complexity of the project, here's what you should generally anticipate:
Average Duration
Most professionally finished basements take 5 to 12 weeks from demo to final inspection. Here’s a rough breakdown of where that time goes:
Pre-construction prep & permitting: 1–2 weeks
Framing and rough-ins: 1–2 weeks
Drywall and insulation: 1–2 weeks
Finishing (flooring, paint, trim, fixtures): 2–4 weeks
Final punch list and inspections: 1 week
Larger basements with bathrooms, kitchens, or custom features can extend into the 10–12 week range.
What Causes Delays
While Berlin Homes builds with efficiency, some factors are simply outside anyone’s control:
Permit delays from the local municipality
Backordered materials, especially flooring or specialty fixtures
Weather-related issues, if exterior access or excavation is needed
Unforeseen conditions, like hidden moisture or structural problems
Inspection scheduling gaps, depending on the availability of local inspectors
Pro tip: Staying flexible with your timeline and making selections early can help avoid bottlenecks.
How Berlin Homes Manages Timelines
We use clear project schedules and weekly updates to keep you informed. You’ll know:
What phase we’re in
What’s happening next
If something changes, and why
We also provide a target completion window at the beginning of the project—and we stick to it as closely as possible.
Basement finishing is one of the most transformative home upgrades you can make—but it’s also a real construction project happening inside your home. Noise, dust, scheduling, and surprise issues are all part of the process. That’s why knowing what to expect isn’t just helpful—it’s essential.
At Berlin Homes, we believe transparency and trust are as important as craftsmanship. We walk every client through the full experience, from design to final inspection, so nothing catches you off guard.
The result? A beautiful, functional, finished basement built for long-term comfort and value—done right the first time.
Thinking about finishing your basement? Let’s talk! At Berlin Homes, we combine construction expertise with personalized service to deliver basements that are both beautiful and built to last.
Schedule a free consultation today and find out exactly what to expect—so your dream basement starts with confidence, not confusion.